
Tree Rescue for Paraglider Pilots
Text and photos by Ancil Nance
Simulation thanks to Brad Hill (pilot model) and Stu Caruk (location and engineering).
If you and your paraglider or hang glilder were snagged in a tree, how would you get out of the situation? That would depend upon how high you were and whether or not you could get out of your harness and onto the tree safely. It would also depend upon what safety equipment you were able to reach. There are three levels of situations:
1) The simplest situation is when you are snagged by a tree and you can grab a branch and climb down.
2) Next would be where you can grab a branch but need to rappel down because it would not be safe to climb down.
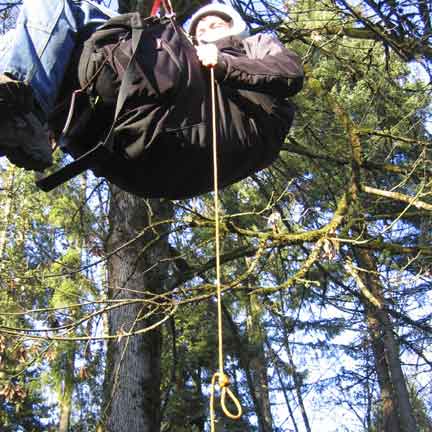
3) The most difficult situation is when your glider is snagged and you are hanging below it far from the tree and are not able to reach any branches.
This article will explain how to rappel from a tree anchor and how to rappel from a glider anchor.
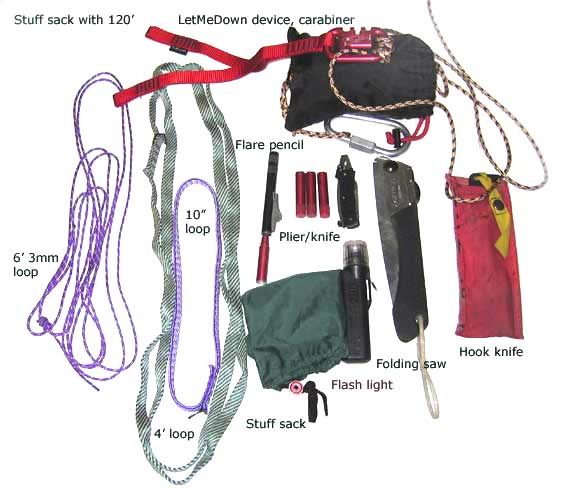
Here is a list of the basic items you need in order to be self-extricating. Your list will vary, depending on what you find you need after practice with your equipment.
• Radio (let your friends know your situation)
• Whistle (help people locate you)
• Flashlight (it could be dark before you get to the ground)
• 6mm (How heavy are you? How much margin do you want?) Perlon line, long enough to get out of any tree you may encounter (120′ seems reasonable). This should be pre-rigged with at least a locking ‘biner, but at best it should have the LetMeDown rappel device on one end and a knot on the other, stuffed in a small bag. 5mm Perlon is rated at 1281 lbs, which is enough IF you don’t bounce. 6mm is a safer choice. The more you weigh the stronger the cord needed.
• A rappel device or carabiner*
• Safety loops made of Kevlar: 10", 4′, 6′ and 10′ (you may need all or none, depending on the situation)
• A couple of carabiners (locking are safer)
*Do yourself a favor and buy the LetMeDown rappel device from https://towmeup.com/shop?olsPage=products%2Ftree-rescue-kit. The kit comes complete with correct rope. This device will speed your extrication and allow you to rappel from anywhere or anything. Read how in the following text.
If your harness has room, a small folding saw will prove handy in case you decide to get you glider free of the tree. You will need a small pliers or wrench to use on the quick links holding the lines to the risers. Sometimes it is easier to get a glider from the tree if the lines are completely free of the risers. The LetMeDown rappel device has wrench slots that fit most quick link nuts.
A word of warning. All of this is just theory unless you practice it. Rappelling is a dangerous thing to do and experienced climbers have shortened their height and even their lives by underestimating the need to check and double check each step. Practice in a safe environment before you try this from a tree. Rappelling from a glider is risky in the extreme, and not recommended, but we explain how anyway.
Situation One
If you get snagged by a tree the first thing to do is radio to your friends that you are either OK, or injured, depending. If you see that you are in easy reach of a good branch or the main trunk then radio that information too, so that a massive rescue effort is avoided. Decide whether or not you can safely tie into the tree with a loop while you try to get the glider free. If that can’t be done safely, then just climb down. You can either leave the harness with the wing or wear it as you climb, or drop it.
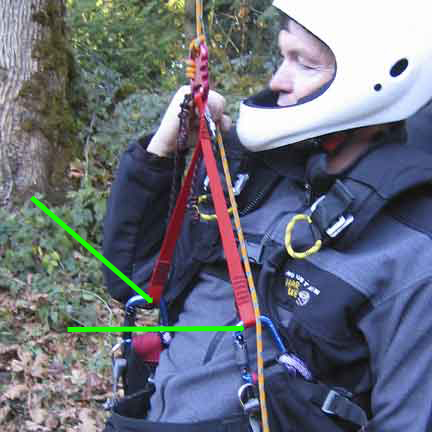
Situation Two
If you can’t just climb down, then you will need to stay in your harness and rig a rappel. Before setting up a rappel be sure to use a loop to tie onto a good branch for safety. Use a loop and cinch hitch. Attach your rappel rope (6mm Perlon) to a solid branch or around the tree with a figure eight knot, bowline, or any method you have pacticed that is safe. If you have a pre-rigged ‘biner with a Munter hitch threaded already, or better yet, if you have the LetMeDown rappel device, then be sure that the rappel ‘biner or device is attached correctly just below the anchor point and that your harness is attached to the rappel equipment, and this may require a 10" loop of Perlon between the two harness ‘biners. If you are standing on a branch, then the weight is off your risers and you can now unclip the harness ‘biners and unclip the safety loop. You are now on the rappel rope ready to descend.
There are three ways you can be attached to the rappel rope and only one of them makes any sense after you have tried all three, but I will describe each. 1) You have only a carabiner, no special device, so you use the ‘biner wrap method, winding loops around the side of the ‘biner opposite the gate. You can control your descent by holding the down-hanging end of the rope.
2) You have a ‘biner and know how to rig the Munter hitch or you have pre-rigged a ‘biner with the hitch threaded, ready to go. Descent rate is easily controlled if you have the correct number of wraps on the ‘biner side opposite the gate.
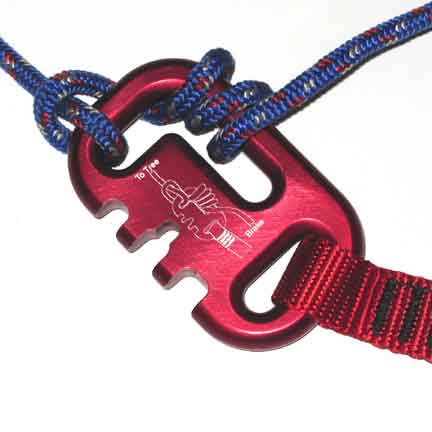
3) You are attached to the rappel rope with a pre-rigged LetMeDown rappel device. This is the only thing that makes sense for glider pilots to use, especially if they have little or no experience in setting a rappel with a carabiner. It is smaller than a carabiner. It is pre-rigged and already attached correctly to your rappel rope, and it has two strong loops to attach safely to your harness carabiners. You will save time and be in safer conditions with this device.
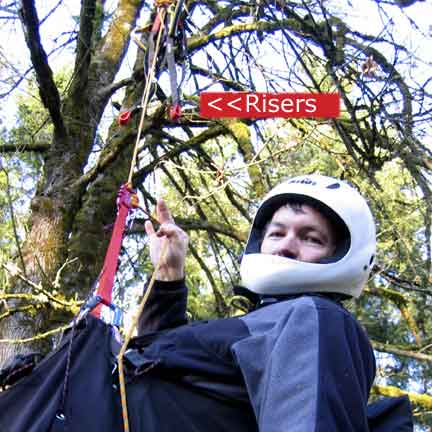
Situation Three
You are snagged in a tree, too far from any branch or the main trunk to make a safe descent possible from a tree anchor. You hope your glider is stuck in the tree. You must now anchor your rappel rope through the quick links where the risers join the lines. Run the end of the rope through the riser quick links. This is a last ditch method because you can only guess how well your glider is snagged to the tree. In most situations it will be obvious. If your glider is spread over many branches and the lines seem to be spread all over the place, then you could be really stuck. If your glider is caught on the sagging tip of a single branch, then you should start thinking about how best to survive a fall.

I think that if I was in doubt I would go ahead and rig the rappel and try to get to the ground as soon as possible. If it looks dicey, then don’t change the aspect of your glider risers. Leave them in their relative positions, maybe even testing to see which riser is carrying the most weight, and see if weight shift alters the glider distribution. This will call for your best judgment, as there will be no going back. No one can predict what is best. Thrashing about trying to throw something to the tree may cause you to fall, so do move gently.
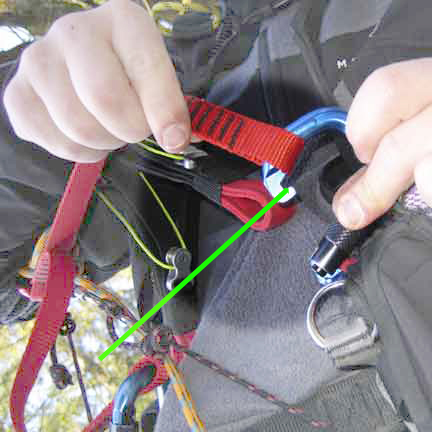
OK, you see the glider is probably going to hold and darkness approaches. There is little chance that a rescue team is going to send a climber up the tree to help you down. It is up to you, so anchor your rappel to the quick links. If you have a bag with your rappel rope and a pre-rigged LetMeDown rappel device, here’s what you do to tie an anchor to the risers, and reattach your harness so that you can rappel down.
THE STEPS
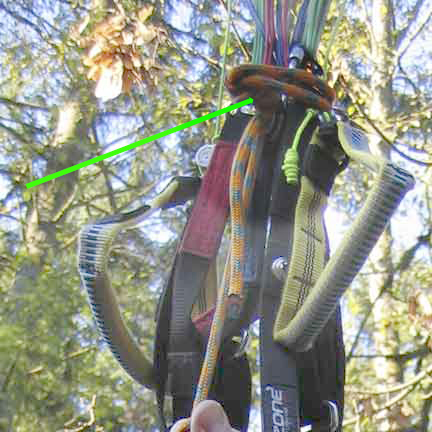
1. Thread the rappel rope through the quick links at the upper end of the risers. Tie it off there with a figure eight knot or a bowline (practice before you need to tie).
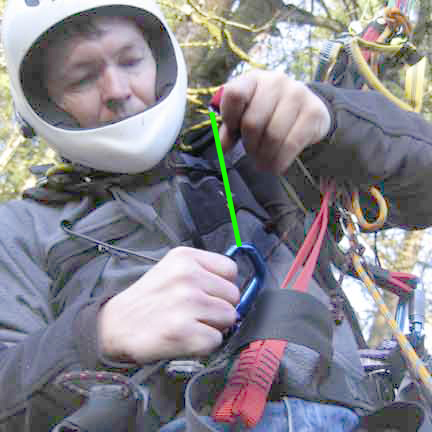
2. You now have an anchored rappel rope with the LMD device (or a ‘biner and Munter hitch, or multiple wraps) on the rope near the anchor. Hanging down from the LMD are two loops which you will need to attach to the harness ‘biners. If you have already pre-rigged the LMD loops with a carabiner on each side, then you simply clip each ‘biner to the harness ‘biners before the next step.
3. Attach the ends of your speed bar lines to the bottom slot in the LetMeDown rappel device. This provides an anchor for the speed system so that you can stand on the speed bar to release pressure on the harness carabiners. If you use the stirrup method, now is the time to rig a stirrup loop cinched around the clot of risers and anchor rope knot. The loop must be long enough for you to step into but short enough to take the weight off your harness risers. Only real practice will determine this, but a 6′ loop should be a good starting point.
4. Tie a knot on the end of your rope so as not to rappel off in case it really doesn’t reach the ground.
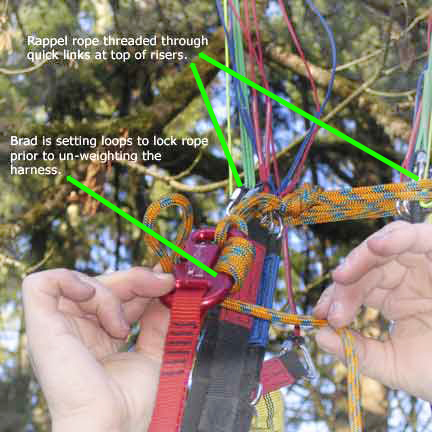
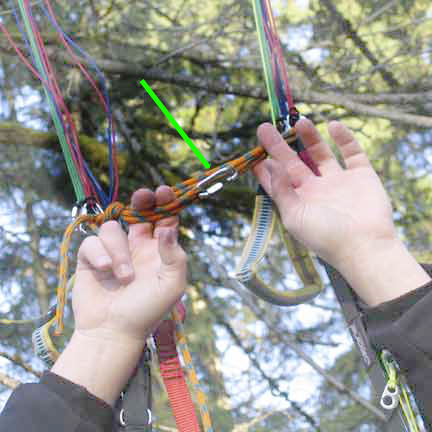
5. Wrap the rappel rope around the rappel device in a manner that will keep it from slipping when you put your weight on it. It must take your weight, when you stand on the speed bar, without slipping. One method of making it non-slip is to take a loop (bight) of the rope and hook it in the notches on the left side of the LMD device. Then bring another bight through that loop and pull to the right, cinching it tight. This must be practiced.
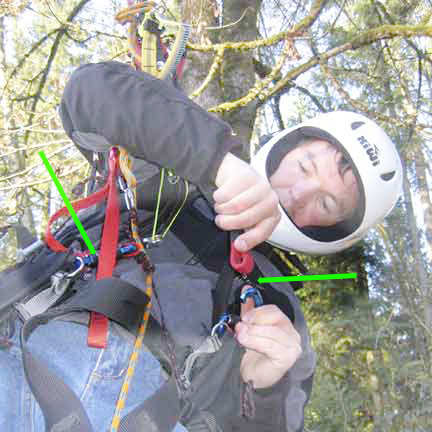
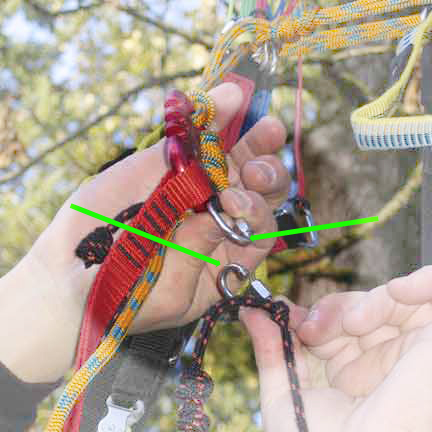
6. Stand on your speed bar until you are vertical. This should un-weight your harness ‘biners and allow you to unclip the risers one at a time and clip the LMD loops in their place. Practice this in a safe environment in order to determine if your speed system is strong enough (In the first demonstration session two systems broke.). Brad Hill came up with this speed system method after watching me use the stirrup method. The stirrup method, using a 6′ loop anchored to the riser quick links, works OK.
If your speed system does not allow its use for weight release, then you will need to use a 6 foot long loop to stand on temporarily while you un-weight your harness. The exact length can be determined in practice. Since it is temporary, the loop can be anchored to the quick link area, cinching it just above the rappel rope anchor clot. You may find it handy to have a chest clip-in point: make a four foot loop, give it one twist to make a figure eight, and put in over your back and slip your arms through the loops. Now you can use an extra carabiner to clip in to the rope/anchor to hold you upright while working on the exchange.
7. While standing on the speed bar or loop, and, if the weight is now off your harness risers, carefully release the loops that have cinched the rappel rope around the LMD device, feeding the line slowly and putting your weight on the rope, stepping off the speed bar (or out of the loop) for a descent, holding the down hanging end in your right hand. Four wraps in the LMD device Munter hitch is a good place to start, but you may need more or less, depending on your weight and the diameter of the rope. The same holds for the ‘biner wrap method. Find how many wraps holds your weight on the line you will be using.
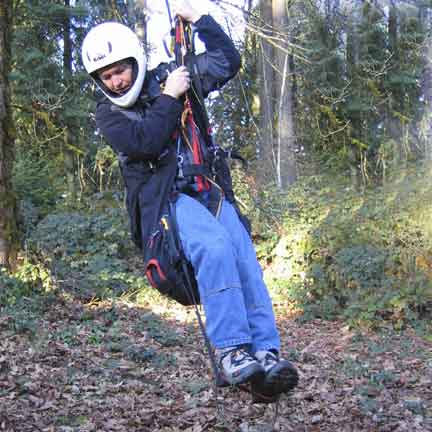
8. After a try or two we were able to get to the ground in about 15 minutes using the speed system method and the LetMeDown rappel device. Wouldn’t that just amaze the rescue teams, to see you standing on the ground below a glider 120 feet high in the tree? You could make up all kinds of stories.
Notes:
Practice of this or any other method is a good idea. We found that some problems could develop if the speed system didn’t allow a person to stand comfortably, so a stirrup may be necessary for some situations. Also, the release of the harness carabiners from the risers and the attachment to the anchor may need to be done with one hand, and some risers are more difficult than others to remove from the carabiners. Try your system before you really need to use it. What can you do with the equipment you have with you in flight?
If other people show up at the base of the tree, then you can alter these steps a bit. Your small diameter line can be lowered and a larger diameter rope can be hauled up. Also, the LetMeDown rappel device can be controlled by someone on the ground holding the end of the rope, in case the person in the harness becomes incapacitated. There are all sorts of variations and practice is the only requirement.
In choosing the diameter Perlon to use, remember that a knot can reduce the strength rating by a third (according to one expert). A 5mm line rated at 1280 lbs, drops to 900 lbs. Which is still OK, if you don’t bounce or weight it suddenly. Minimums work until unexpected circumstances blow them out. I weigh 150 lbs. without glider, so I have opted for 120 feet of 4mm Perlon which is rated at 750 lbs, and would be enough unless I had to bounce a bunch. I have practiced with this set up and used it in a tree rappel. Note: 6mm is of course safer for larger bodies and Stu’s kit has 6mm static cord custom made with a breaking strength in excess of 2400 pounds. A ‘biner wrap or a Munter hitch will work with almost any diameter of cord. If a figure eight knot is used to anchor to a branch or through the risers then the knot does not diminish the strength rating of the line. Sharp edges near the anchor point must be avoided since the descent may saw the rope back and forth.